
⭐️What is website architecture?
A website architecture is basically an architecture that comprises of a sets of parameters and standard checks which ensures that the website is SEO-friendly from an architectural perspective. The key benefits of having a better architecture is to ensure that the link juice is flowing properly throughout the website and also there are no-hidden crawl errors that might cause a disruption with the SERP visibility in the long-run!
⭐️The Analysis
⭐️Chapter 1: URL Structure Analysis
Type a: Navigational Page URL analysis
Navigational pages are basically the important and the secondary important pages of a given website! An example of the navigational page for this particular campaign is as under:

⭐️Observation:
As checked the footer link is well optimized.

Also, the URL structure don’t have any major issues.
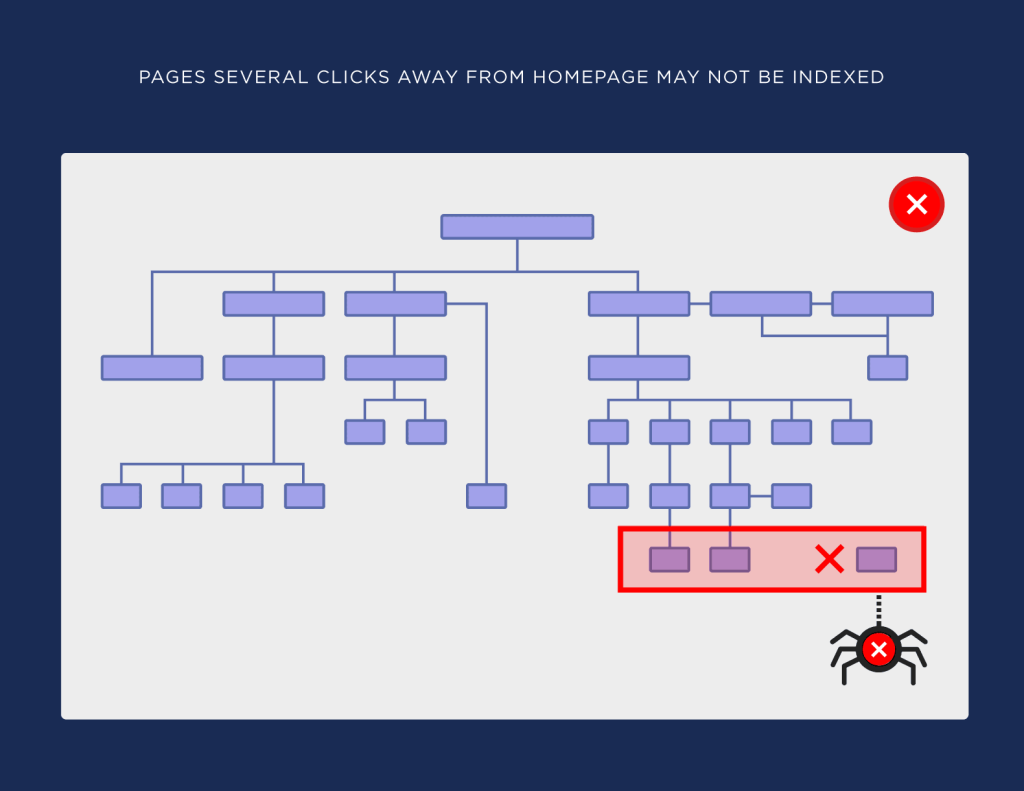
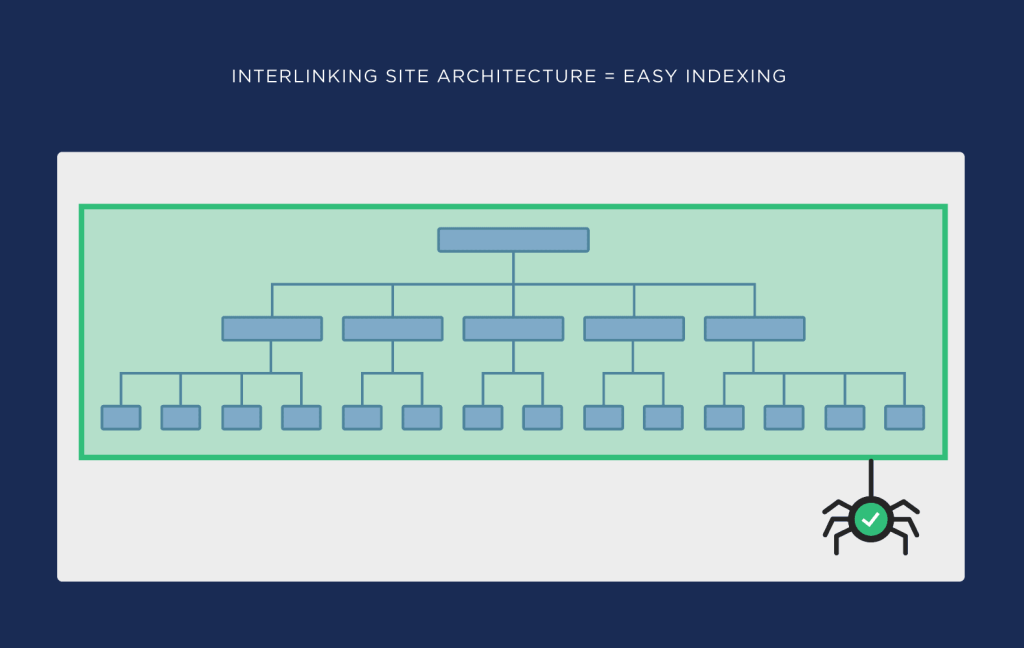
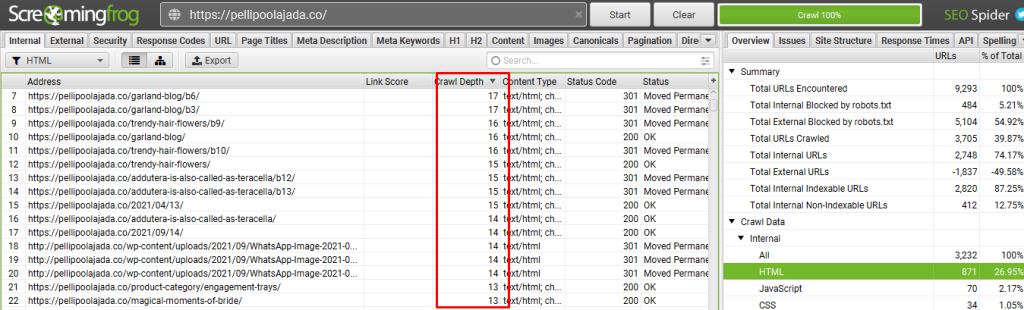
⭐️Chapter 2: FLAT Structure Analysis / Crawl-Depth Analysis
Flat architecture is nothing but just a standard architecture where any given pages can be reached by a user in less than 4 clicks from the home page. This factor is often also referred to as Crawl-depth analysis as well which measures the no. of clicks a user needs to perform to reach a particular page.
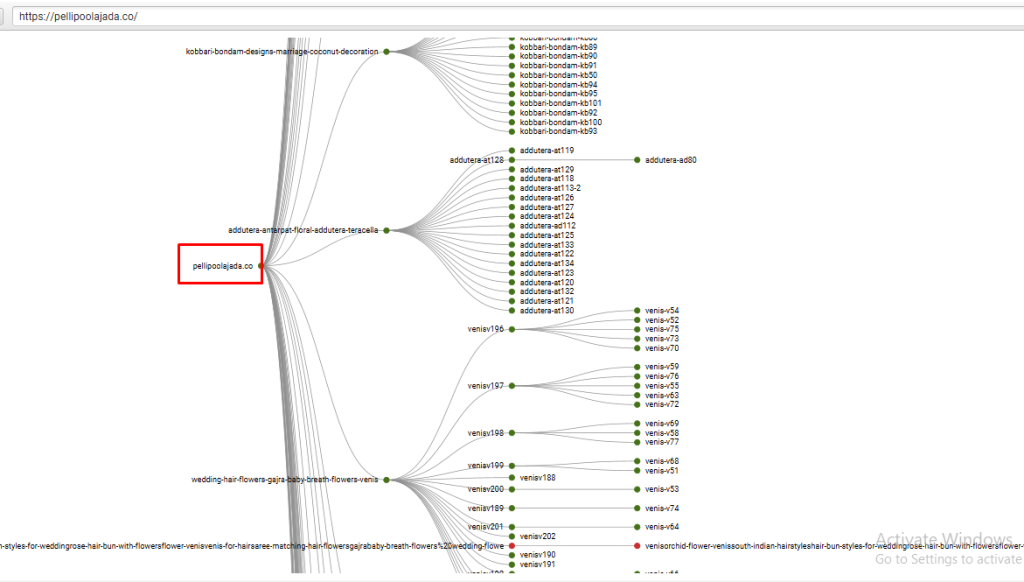
Diagrammatically, it’s represented as under:
⭐️Observation:
- Open Screaming Frog Spider
- Scan your Website
- Click on “Visualizations”. Then Click on “Crawl Tree Graph”.

As seen from the above tree graph that we can easily check the “CRAWL DEPTH” marked as 1,2,3,4 and 5. Now, all the pages which falls under “5” should be optimized for reducing the depth to 4 or less.
As you can see that the highest crawl depth is 4,
Need to implement HTML sitemap in the website, to reduce the crawl depth.
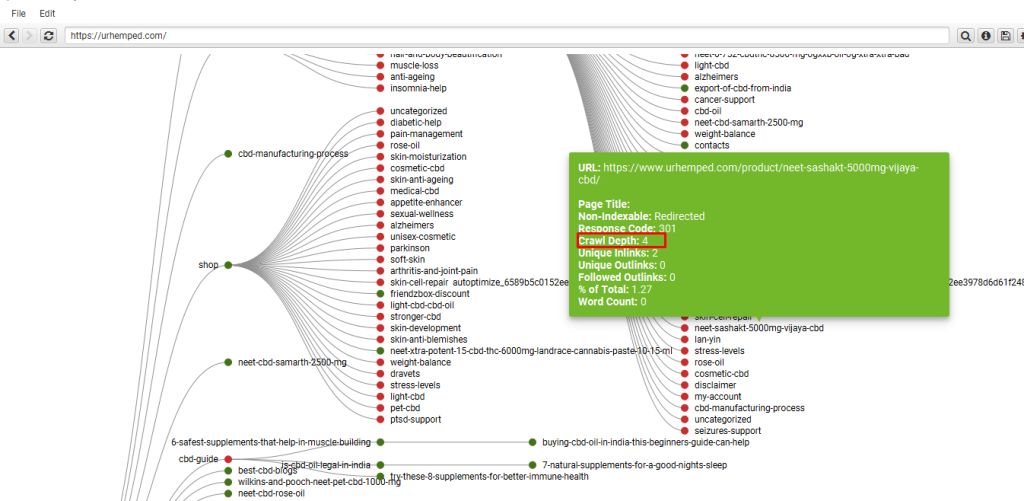
Chapter 3: Hierarchical Analysis
Orphaned pages normally describe such pages which are orphaned from rest of the pages of the website. In other words, such pages have high crawl depth and have poor user responses such as high bounces and are buried deep inside a website’s architecture.
⭐️Observation:
- Click on “Visualizations” and click “Force-Directed Crawl Diagram”.
- You will see something as shown below:
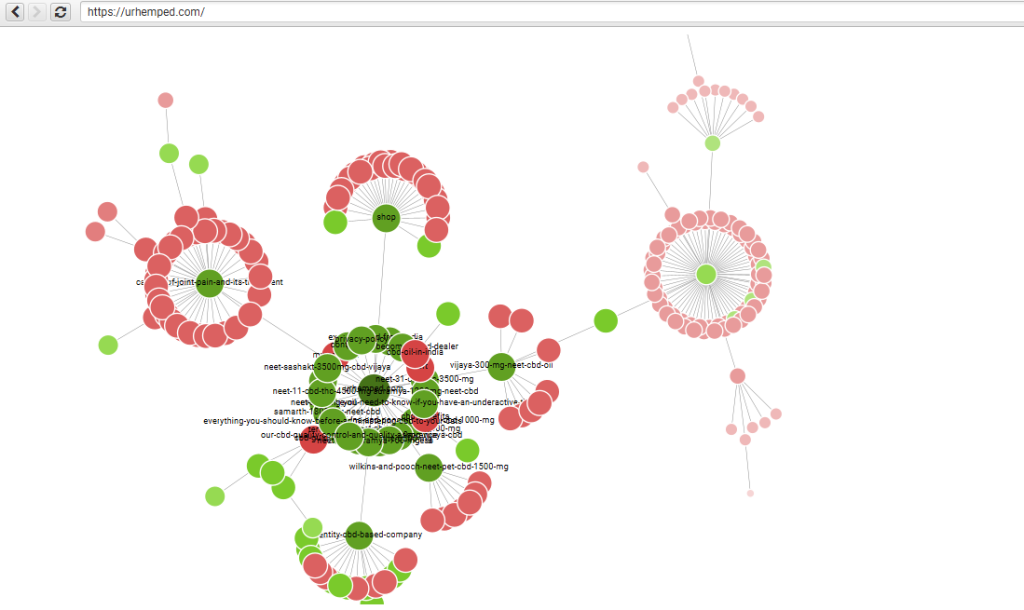
- As seen from the above screenshot, the URL’s (NODES) marked as RED Boxes are the URLs which can be treated as Orphaned as they have high Crawl-depth and buried deep down.
- For example, I have chosen one NODE (URL), as you can see from the screenshot below, the URL can be identified and also the Crawl-depth can be spotted!
P.S: Please note, these pages are different than the page’s ones which you can spot from simple Crawl-tree crawl depth as in “Force-Directed Crawl”, extreme nodes can be visualized which will show the pages that are buried deep down without any trackback on linking to other pages!
As checked these nodes are basically the tag and category pages, and not necessary for search engine, so, no action needed.
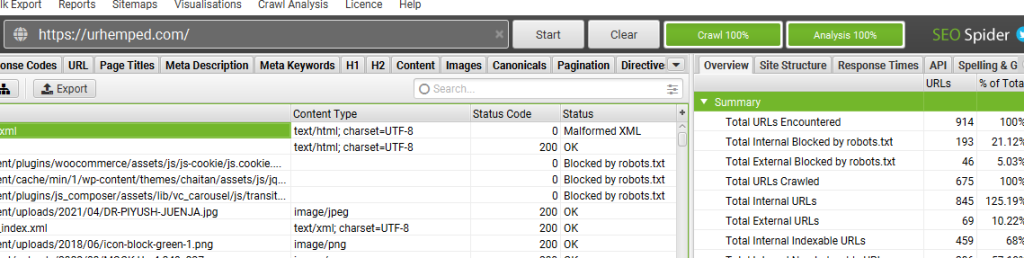
⭐️Chapter 4: Spotting Issues within the XML Sitemap
XML sitemap is a very important element when it comes to SEO and website Crawling. XML file is the file that web crawler’s crawls on the first-hand to get the complete idea and the list of the URLs present within a given website. Any issues within the same will be a problematic factor for the overall website crawling and the efficiency of SEO will decrease!
⭐️Observation:
- Click on “Configuration” and select “Spider”
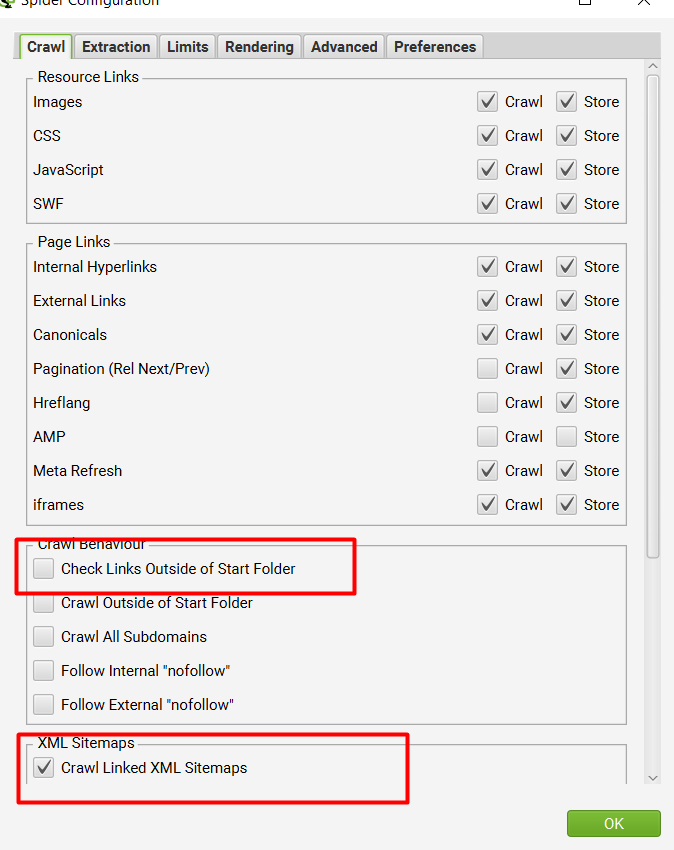
- Then Keep the settings as shown below. Basically, you need to untick all options and only allow the XML to be crawled.
- Once done, then you would be able to see all the issues pertaining to the XML sitemap as shown on the below screenshot:
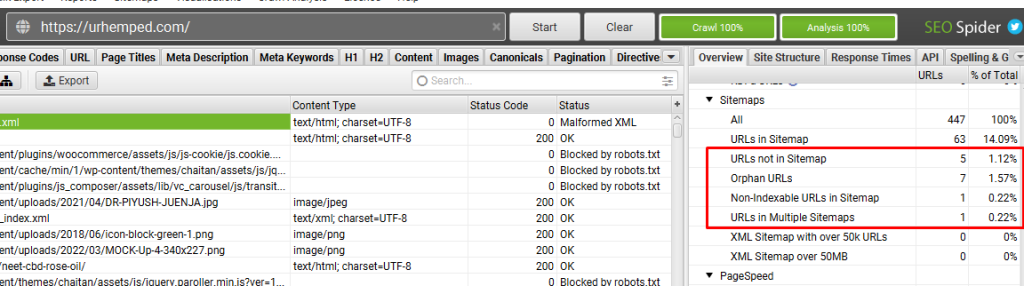
⭐️Recommendation:
- URLs not in Sitemap = If any URL is not present within the XML sitemap then please add them, as not having an URL within a XML will not help with any indexing of that particular URL.
- Orphan URLs = Any URLs under this segment should be immediately removed!
- Non-index able URLs in Sitemap = Any URLs under this segment should be immediately removed!
- URLs in Multiple Sitemaps = Any URLs under this segment should be immediately removed!
⭐️Crawl Depth Analysis:
CRAWL DEPTH:
Crawl depth is the extent to which a search engine indexes pages within a website. Most sites contain multiple pages, which in turn can contain subpages. The pages and subpages grow deeper in a manner similar to the way folders and subfolders (or directories and subdirectories) grow deeper in computer storage.
First:
Crawl the Website on Screaming Frog:

Next, go to internal pages and check the depth:
⭐️Observation:
Some of the pages are not optimized with crawl depth.
⭐️Check the crawl tree graph for better view:
At any given time the crawl depth of a page in your website is the number of clicks a user has to perform from the home page before he/she lands on the destination page.
The recommended crawl depth is <3.
⭐️Status: Need to fix the crawl depth
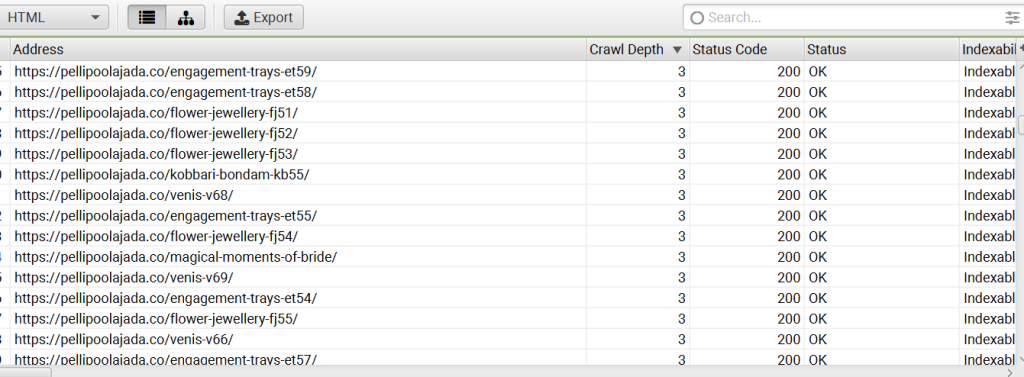
⭐️After Fix:
Here we have fixed the crawl depth. Now the crawl depth is 3.
⭐️Web Scraping & Data Extraction:
The custom extraction feature allows you to scrape any data from the HTML of a web page using CSSPath, XPath and regex. The extraction is performed on the static HTML returned from URLs crawled by the SEO Spider, which return a 200 ‘OK’ response. You can switch to JavaScript rendering mode to extract data from the rendered HTML.
1) Click ‘Configuration > Custom > Extraction’
This menu can be found in the top level menu of the SEO Spider.
This will open up the custom extraction configuration which allows you to configure up to 100 separate ‘extractors’.
2) Select CSS Path, XPath or Regex for Scraping
The Screaming Frog SEO Spider tool provides three methods for scraping data from websites:
- XPath – XPath is a query language for selecting nodes from an XML like document, such as HTML. This option allows you to scrape data by using XPath selectors, including attributes.
- CSS Path – In CSS, selectors are patterns used to select elements and are often the quickest out of the three methods available. This option allows you to scrape data by using CSS Path selectors. An optional attribute field is also available.
- Regex – A regular expression is of course a special string of text used for matching patterns in data. This is best for advanced uses, such as scraping HTML comments or inline JavaScript.
CSS Path or XPath are recommended for most common scenarios, and although both have their advantages, you can simply pick the option which you’re most comfortable using.
When using XPath or CSS Path to collect HTML, you can choose exactly what to extract using the drop down filters –
- Extract HTML Element – The selected element and all of its inner HTML content.
- Extract Inner HTML – The inner HTML content of the selected element. If the selected element contains other HTML elements, they will be included.
- Extract Text – The text content of the selected element and the text content of any sub elements.
- Function Value – The result of the supplied function, eg count(//h1) to find the number of h1 tags on a page.
3) Input Your Syntax
Next up, you’ll need to input your syntax into the relevant extractor fields. A quick and easy way to find the relevant CSS Path or Xpath of the data you wish to scrape, is to simply open up the web page in Chrome and ‘inspect element’ of the HTML line you wish to collect, then right click and copy the relevant selector path provided.
For example, you may wish to start scraping ‘authors’ of blog posts, and number of comments each have received. Let’s take the Screaming Frog website as the example.
Open up any blog post in Chrome, right click and ‘inspect element’ on the authors name which is located on every post, which will open up the ‘elements’ HTML window. Simply right click again on the relevant HTML line (with the authors name), copy the relevant CSS path or XPath and paste it into the respective extractor field in the SEO Spider. If you use Firefox, then you can do the same there too.

You can rename the ‘extractors’, which correspond to the column names in the SEO Spider. In this example, I’ve used CSS Path.
The ticks next to each extractor confirm the syntax used is valid. If you have a red cross next to them, then you may need to adjust a little as they are invalid.
When you’re happy, simply press the ‘OK’ button at the bottom. If you’d like to see more examples, then skip to the bottom of this guide.
Please note – This is not the most robust method for building CSS Selectors and XPath expressions. The expressions given using this method can be very specific to the exact position of the element in the code. This is something that can change due to the inspected view being the rendered version of the page / DOM, when by default the SEO Spider looks at the HTML source, and HTML clean-up that can occur when the SEO Spider processes a page where there is invalid mark-up.
These can also differ between browser, e.g. for the above ‘author’ example the following CSS Selectors are given –
Chrome: body > div.main-blog.clearfix > div > div.main-blog–posts > div.main-blog–posts_single–inside_author.clearfix.drop > div.main-blog–posts_single–inside_author-details.col-13-16 > div.author-details–social > a
Firefox: .author-details–social > a:nth-child(1)
The expressions given by Firefox are generally more robust than those provided by Chrome. Even so, this should not be used as a complete replacement for understanding the various extraction options and being able to build these manually by examining the HTML source.
The w3schools guide on CSS Selectors and their XPath introduction are good resources for understanding the basics of these expressions.
4) Crawl The Website
Next, input the website address into the URL field at the top and click ‘start’ to crawl the website, and commence scraping.
5) View Scraped Data Under The Custom Extraction Tab
Scraped data starts appearing in real time during the crawl, under the ‘Custom Extraction’ tab, as well as the ‘internal’ tab allowing you to export everything collected all together into Excel.
In the example outlined above, we can see the author names and number of comments next to each blog post, which have been scraped.
When the progress bar reaches ‘100%’, the crawl has finished and you can choose to ‘export’ the data using the ‘export’ buttons.
If you already have a list of URLs you wish to extract data from, rather than crawl a website to collect the data, then you can upload them using list mode.
That’s it! Hopefully the above guide helps illustrate how to use the SEO Spider software for web scraping.
Obviously the possibilities are endless, this feature can be used to collect anything from just plain text, to Google analytics IDs, schema, social meta tags (such as Open Graph Tags & Twitter Cards), mobile annotations, hreflang values, as well as price of products, discount rates, stock availability etc. I’ve covered some more examples, which are split by the method of extraction.